This article will discuss the usage and creation of locations and location templates in FlyFreely, and will cover the following topics.
What is a Location?
A location is the term used in FlyFreely to describe the general area where your operation takes place. This might include the actual planned flight area, other areas of note (eg danger areas), crew positions, take-off and landing areas etc.
All mission plans must include a location. Accurately defining your mission location allows you to identify potential hazards, privacy concerns and other issues that may affect your mission.
You can create locations during the mission planning process, or create a location template from the dashboard. Location templates can then be quickly selected while planning a mission, so there's no need to re-draw the same locations over and over.
Airspace Information
Although locations are displayed in 2D form, proper mission planning obviously needs to include the 3rd dimension - airspace. FlyFreely's mapping function includes layers for the following types:
- Heliports
- Commercial Aerodromes
- Controlled Airspace (Class C and D)
- Restricted Areas
- National Parks
Each layer can be toggled on/off, to more clearly show the airspace and allow you to better understand the mission environment.
Using the Location Editor
Whether you're creating a one-off location from within the mission planning screen or creating a reusable location template, you'll be doing so via the location editor.
This feature combines mapping with airspace overlays, comprehensive drawing tools and markers to help capture the details of your site plan.
1. Locate Mission Area
To start, you need to locate your mission area on the map. You can find a location in one of 3 ways:
- Search for the location using the search box in the upper-right corner of the map.
- Manually zoom into your intended location on the map.
- Upload a .KML or .KMZ file using the button Upload Geometry button (take me there)

Check Nearby Airspace (where available)
In some jurisdictions, you will be able to view overlays of any relevant designated airspace (including restricted areas, aerodrome control zones etc). If available, this will be overlayed on the map view as shown below. You can toggle individual layers using the dropdown menu, by clicking on the Layers button.

Airspace boundaries are marked on the map, and clicking inside these areas displays a pop-up with the details of the selected area.

2. Draw Flight Area
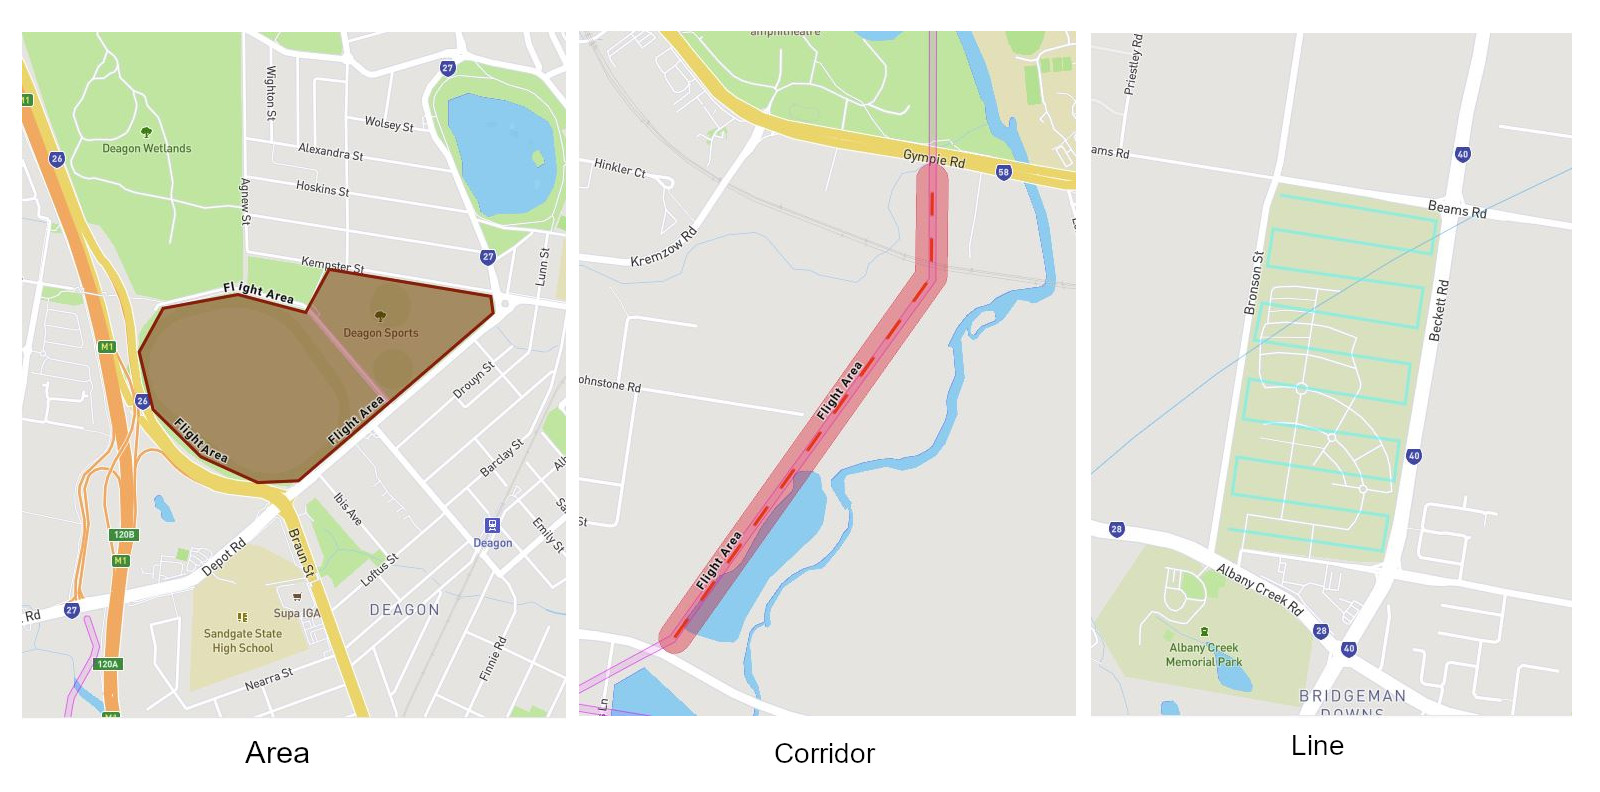
Next, zoom back to your area of operations. Depending on the nature of your mission, you can use one of the following drawing tools to create your areas:
- Area - Create a polygon by drawing in the boundary (most common).
Click + in the areas box to add a new area.
Click on a point to begin. Follow the outline of your flight area, clicking on each 'point' until finished. Double click on the last point to complete the area. - Line - Draw a simple line with 0 width.
Click + in the lines box to add a new line.
Click on the start point, and extend the line by clicking at each 'point'. Double click on the last point to complete the line. - Corridor - Draw a line and set a width to create a long, narrow area.
Click + in the corridors box to add a new corridor.
Click at the start point, then click at each point to extend the line. Double click to complete the line. Once complete, an area is shaded based on the default 50m offset. Change the offset value as required.
You can add as many areas/corridors/lines as needed to represent your operations area, in any combination.
To edit any of these elements, simply click on them. You can drag the vertices around to edit the shape, or change the name and other properties.

3. Add Details
Once your basic flight area is complete, you can add additional details to your location. These details can include:
- Danger, no fly and areas of interest
Draw in your area in the same way as discussed above. Once finished, click on the area to edit it's properties and select the appropriate type. The area will change shading to match the selected type. Give the area a descriptive name then close the properties panel. - Markers (Crew, Take-off/Landing and points of interest)
Click + in the markers box. Place your marker on the map, then give it a type in the properties panel. The marker name will update based on it's type, and you can edit this if required.
The end result might look something like the example below:
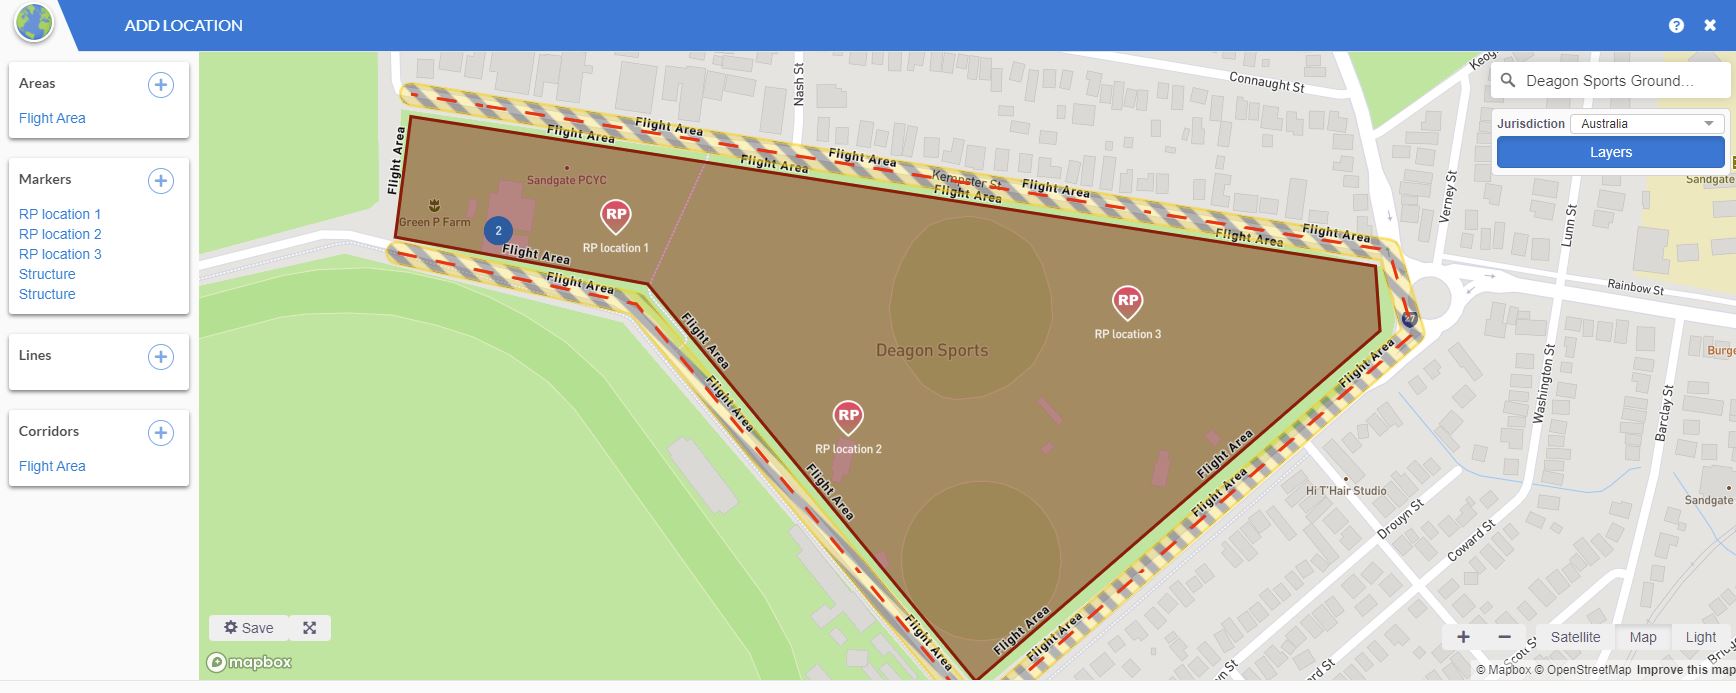
This location contains the following elements:
- Flight area (area) covering the entire area of operations.
- Danger area (corridor) highlighting the public roads on 3 sides of the flight area.
- 3x Remote pilot locations (marker - RP) spaced to maintain VLOS over the area.
- 2x Points of interest (marker - POI) denoting structures within the flight area.
4. Save the Location
Once you're satisfied with the details included in the location, give your new location a name. When the name field is completed, you'll be able to click Save to save the location.
It's good practice to develop a consistent naming convention for your locations.
Importing .KML Files
KML / KMZ Files
KML (Keyhole Markup Language) is a file format used to display geographical data. KML files are used in many mapping and related applications, including Google Earth. FlyFreely allows you to import existing KML files to create your mission locations, and export locations in KML format for use in other software.
KML files can have many different formats, FlyFreely currently supports 2D polygon type files. Other types of KML features (for example, a path-type file) may not work correctly.
You can also export FlyFreely locations in KML format. This allows you to use the location in software such as Google Earth and other mapping applications.
If you already have a KML (or KMZ) file for your location, you can import it via the Upload Geometry button in the location editor.

This function will import your existing KML to the editor, including any elements in that file. Once the file is imported, these elements will be listed within the areas / markers / lines / corridors sections. You can edit these as required, and add additional elements if needed. To edit imported elements, simply follow the same steps as for those created in FlyFreely.
There can be an issue on windows machines where KML files won't import (nothing appears to happen). This is due to a file permissions issue in the operating system and the easiest way to fix it is to install Google Earth Pro (free download). This will reset the permission on the KML file type and FlyFreely imports will work properly.
Using Location Templates
If you know in advance that you'll be visiting the same site several times, you can save time by creating a location template. This works the same as creating a location via the mission planning screen, but saves the location as a template which can be easily selected (and edited if needed) next time you plan a mission there.
There are two ways to create a location template:
- Click + to create a location from scratch, this can be found under Location Templates on the Manage dashboard. This will open the location editor window and the steps are identical to those outlined in the location editor section above.

- Click the clone button to generate a template from an existing mission. You'll be able to select the relevant mission from a dropdown list, and load that mission's location into the editor. You can then make any required changes and save the location as a template.


The new location will now appear in the location templates list, and will be available for selection within the mission planning screen. Simply select the template from the dropdown menu to use it in your mission.

After selecting a location template for your mission plan, you can make changes by clicking the edit button, in order to customize the location for that specific mission.
Note that changes made from within the mission will not affect the original location template - only the version attached to that mission.