The LOTAMs feature provides a convenient platform for administrators to publish notices within their organisation.
This article will cover the following aspects of LOTAM management. Click below to go to the relevant topic.
Mission Planning with Active LOTAMs
View and Acknowledge LOTAMs on the Field App
Viewing the LOTAM on the Mission Record
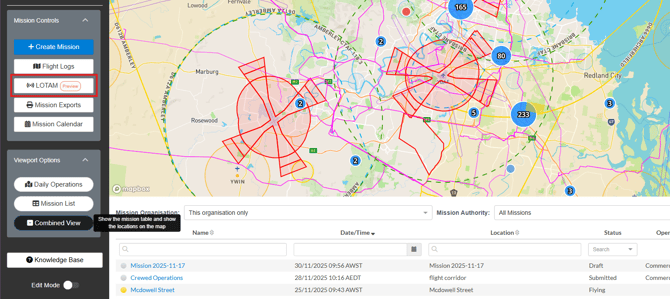
Navigate to LOTAMs
Access the LOTAM page from sidebar on the Missions dashboard.
The LOTAMs List
This window displays a list of your organisation's LOTAMs. You can create new notices, view, edit and clone existing notices here.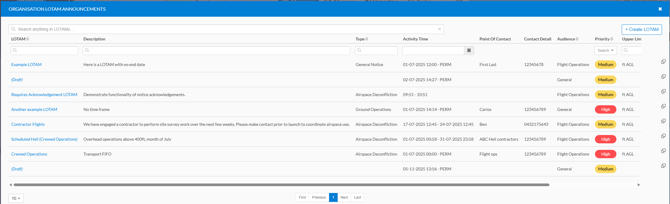
- To view the details of a notice, simply click on it's name in the leftmost column.
- To clone a notice, use the 'double-box' icon on the far right of the window.
Creating a new LOTAM
Click + Create LOTAM.
You will be presented with the form shown below. Fields marked with a red tick are mandatory.

Notes on LOTAM fields
Start / End times:
-
All notices must have a start time/date. For ongoing notices, leave the end time/date blank.
-
If an end time/date is selected, the notice will automatically be cleared at that time.
The Start Time must be entered before the LOTAM area is drawn. The platform will throw an error if the start time is not entered beforehand.
Type (Optional):
-
You can set up various LOTAM types according to your organistion's needs - see below for details. Types can be applied optionally to any LOTAM.
Operating Requirement:
- None - no actions are required for the user. The user will still see the LOTAM area but no further action required.
- Acknowledge - this requires the pilot/planner to acknowledge the LOTAM in order to complete the mission plan. Additionally, the user responsible for executing the mission on the field app will need to acknowledge the LOTAM to proceed.
- Block - this will block the pilot/planner from proceeding with the mission if they are planning on flying within the drawn LOTAM area.
- Automatic - this evaluates all drawn LOTAM area(s), identifies the highest level of restriction, and automatically sets the operating requirement accordingly. LOTAM areas can be classified as Area of Interest, Danger, or No-Fly. If the highest LOTAM area is classified as:
- "Area of Interest" - the operating requirement is automatically set to 'None'
- "Danger" - the operating requirement is automatically set to 'Acknowledge'
- "No-Fly" - the operating requirement is automatically set to 'Block'
Map Details/LOTAM Area:
- The drawing tools available for LOTAMs are Area and Corridors.
- LOTAM markups can be classified as Area of Interest (Areas only), Danger, and No Fly Area.
- The drawing and markup tools function identically to the normal location tools used in mission planning.
- Each classification uses a distinct pattern, as illustrated in the image below.

Where an active LOTAM has an associated area, the area will be visible on all maps in FlyFreely - including mission planning. This gives planners a direct view of the area while they plan their mission/s.
If 'No LOTAM Area' is selected, the active LOTAM is applied to all missions within the active time set.

Links & Attachments:
-
Any links or attachments included in the LOTAM will be viewable by the user.
Edit LOTAMs
To edit an existing notice, open it and click EDIT in the bottom corner of the window.
Notices can be edited even after publication. For notices where audience acknowledgement is required, you will have the option to either save it with or without voiding current acknowledgements.
- Save: Useful for making minor changes that don't require re-acknowledgement
- Save & Void Acknowledgements: Generally used for more consequential edits that require a new acknowledgement (for example - changing operational timing or other details of manner aircraft ops)

LOTAM Types (Optional)
LOTAMs can be tagged into 'types', which are user-configurable. To create or edit types, navigate to Organisation Admin > Mission Configuration > LOTAM Types.
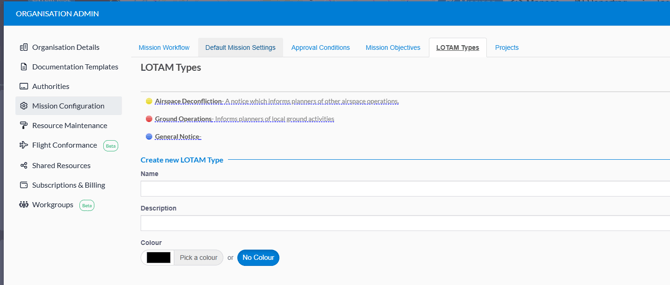
Types are set at the organisation level, and can be used to 'tag' notices. In the above example we've used a simple Air / Ground / General division, but types can represent any aspect of the notice, as required.
Each type can be colour coded using the optional colour-picker underneath the text fields.
Once one or more types have been added, they'll automatically be available via the 'type' dropdown in the 'Create LOTAM' window described above.
Mission Planning around LOTAMs
When planning a mission in proximity to an active LOTAM, it will be displayed directly on the mission planning screen. Where the notice has been assigned a location - it will be displayed on the mission planning map, as shown below.
To display relevant LOTAM/s, both the location and planned time/duration must be entered. Once this information has been entered, save the mission plan to refresh and display LOTAMs.

In the above example, the LOTAM requires acknowledgement. The planner will not be able to complete this mission plan without acknowledging the notice using the blue 'acknowledge' button.
If the planned flight does not intersect the LOTAM area, acknowledgement won't be required, however the LOTAM area will still be displayed on the mission map.
If the planner requires more information before proceeding with their mission, they can use the contact information provided in the LOTAM to seek clarification.
If the planned flight area intersects a LOTAM area with an operational requirement of ‘Block’, it will be highlighted in red and a warning will be displayed to the planner. The mission cannot proceed.

View and Acknowledge LOTAMs in the Field App
You can view LOTAMs generated in the Office App within the Field App.
Sync your Field App to ensure it displays the latest information from the server.
Acknowledging LOTAMs During Mission Planning (Field App mission planning)
The LOTAM(s) appear at the bottom of the mission plan. A black “Ack. Required” text is displayed when a LOTAM requires acknowledgement. Tap the LOTAM to open it.

Scroll to review the details, then tap 'Acknowledge'.


Once all required LOTAMs have been acknowledged, the status text will turn green and display ‘Acknowledged’, and you’ll be able to proceed to ‘Fly’.

Acknowledging LOTAMs During Mission Execution (Office App pre-planned mission)
The LOTAM(s) of a pre-planned mission appear at the 'Pre-Mission' stage. A black “Ack. Required” text is displayed when a LOTAM requires acknowledgement. Tap the LOTAM to open it.

Scroll to review the details, then tap 'Acknowledge'.


Once all required LOTAMs have been acknowledged, the status text will turn green and display ‘Acknowledged’. Proceed with your workflow as usual.

Viewing the LOTAM on the mission
You can view the active LOTAM(s) at the time of a completed mission in the office app.
From the Missions dashboard click on the relevant mission in the missions list.

This will open the mission record. Click on the NOTAM/LOTAM tab on the right hand side to view all active LOTAM(s) at the time the mission was completed.

This tab only displays the active LOTAM(s) at the time the mission was completed.
No additional information is logged here eg if the LOTAM was acknowledged and by who.