The FlyFreely platform allows you to easily log the usage of your RPA batteries. This article will cover the following:
View & Edit A Flight Battery Set
Adding a new Battery
To begin, navigate to the Batteries widget from the dashboard. If the Batteries and Flight Battery Sets widgets are not shown on the dashboard, check the relevant checkboxes in the Left Nav Bar.
For more information about batteries and flight battery sets, click here.
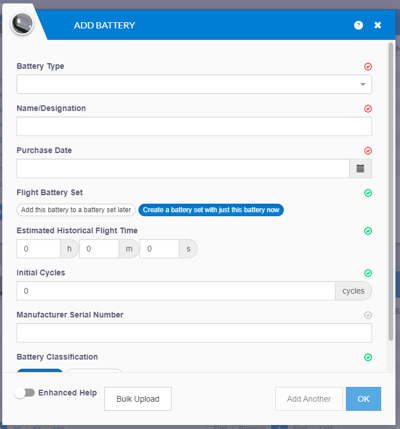
Click on the Add button (⊕) to open the add Battery dialogue. Fields marked with a red ⓧ are compulsory. The red ⓧ will turn green once you enter some data.
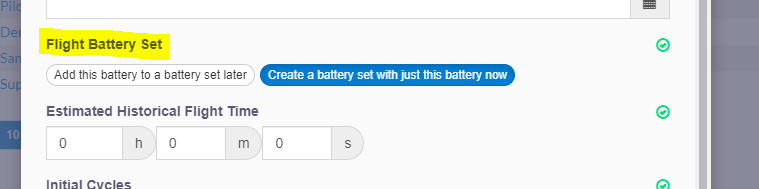
If your RPA operates on a single battery, you should make sure that 'Create a battery set with just this battery now' is checked. This will automatically create a matching set (containing just that battery) and means you can skip the next step.
For RPAs that operate on 2 or more batteries, please leave this box unchecked - you will create your flight battery set in the next step.
You may now either add another battery by clicking the Add Another button or add the battery/batteries to the Battery list by clicking the OK button. Clicking OK will close the Battery dialogue and return to the Battery widget. Go to the end of the list to see the newly added battery.
View & Edit a Battery
To view or edit the details of a battery, click it's name in the Battery widget.
This panel gives you access to the basic details of the battery, along with the flight and maintenance histories. The notes section can be used to record any relevant notes to that battery.
Close the dialogue by clicking the Close ⓧ button to return to the Battery widget.
The Manage button allows you to retire a battery from service (eg to remove an old or damaged battery from your battery list) or placed under maintenance.
Creating A Flight Battery Set
A Flight Battery Set is a set of one or more batteries which powers an RPA. For a detailed explanation of Batteries and Flight battery sets, click here.
To create a Flight Battery Set, Click the ⊕ button on the Flight Battery Sets widget. Name the new set and enter the date that this set was assembled. The nominated Assembly Date determines which batteries can be added to the set (only batteries procured before the assembly date will be available).
Click Save to complete creation of the Flight Battery Set.
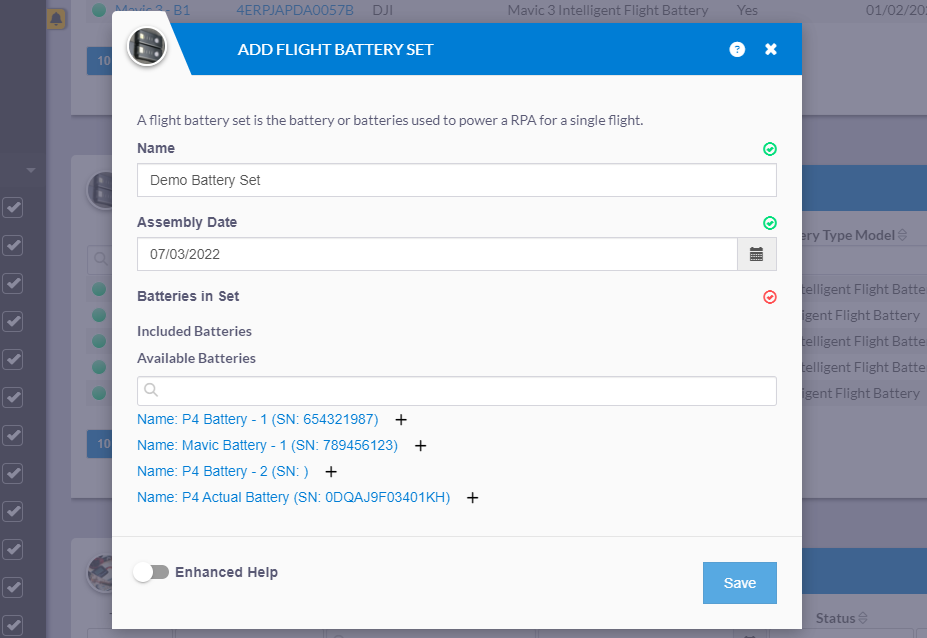
Make sure that there is at least one battery of the type you wish to add to a Battery Set. (A set must consist of a single battery type.) You add a battery to the Battery Set by selecting the set in the Flight Battery Set widget. This opens a dialogue that allows you to edit the Battery Set.
Click the Edit button. Initially, the dialog that opens may show that no batteries are included in the set. Click the + button to the right of one of the batteries you wish to include in the battery set. This will add the battery to the list of Included Batteries and remove it from the list of Available batteries. Add any further batteries, (the list will now be filtered so only batteries of the same type are shown), you wish to include in this battery set. Click the Save button.
Note: Once a battery set is assembled and used in a flight, it cannot be modified. You must disassemble the set and create a new one (see below for instructions).
View & Edit A Flight Battery Set
To view or edit the details of a flight battery set , click it's name in the Flight Battery Sets widget. Close the dialogue by clicking the Close ⓧ button to return to the Flight Battery Sets widget
If you have to replace a battery in a battery set, and the battery set has already been used, you will need to disassemble the battery set and create a new one. This ensures accurate record keeping of your batteries.
1. To disassemble a battery set, click on the battery set from the flight battery set widget.
2. Click on Edit.
3. Select the Disassembly Date
4. Click Save.
5. Follow the instructions above to add a new battery and create a new flight battery set.