Commercial drone operators in New Zealand can now request access to controlled airspace through the FlyFreely Office App and Field App. The platform works seamlessly with AirShare, using its public flight request and authorisation APIs to allow users to access controlled airspace with the click of a button.
This article will cover:
Registering on FlyFreely (first time users)
Change existing AirShare registration
Requesting Authorisation via Office App
Requesting Authorisation via Field App
Account requirements
This capability is available to all users that plan missions in New Zealand. To access the authorisation, the account will need the following:
- Authority types - Part 101 and Part 102
- Assigned CRP - For automatic authorisations, a Chief Remote Pilot (CRP) must be assigned to a user within the organisation. To assign the CRP role to a new user or an existing user, see How to add personnel
Registering on FlyFreely
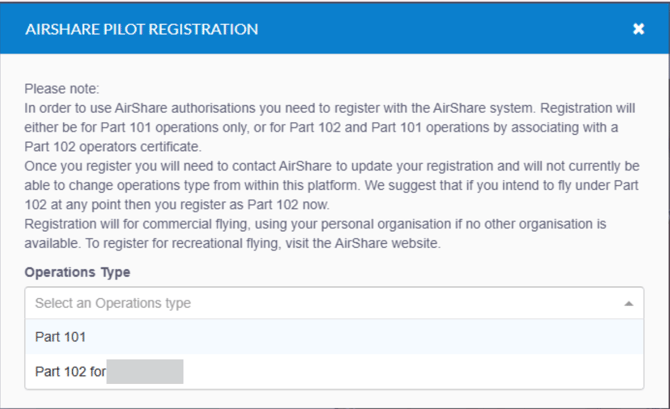
If this is your first time requesting Airshare Authorisation via the FlyFreely platform, you will need to register first via the mission plan. Click on 'Register User'.

Please register under the same authority you have with Airshare. Please read the conditions in the pop-up window:
You will receive an email from AirShare to confirm the registration with FlyFreely, it should look something like this:

Follow the prompts to complete the registration:

Changing your existing registration:
If you have registered and would like to change your operations type, you will need to contact AirShare to update this change.
You will not be able to change operations type from within this platform.
Once you have made the change on with AirShare directly, please contact support@flyfreely.io to update this manually in the backend.
Requesting Authorisation via Office App
Note: This integration does not work for dummy missions.
When planning a mission in an area that requires an Airshare approval, the panel will appear on the left, indicating that an approval may be possible.
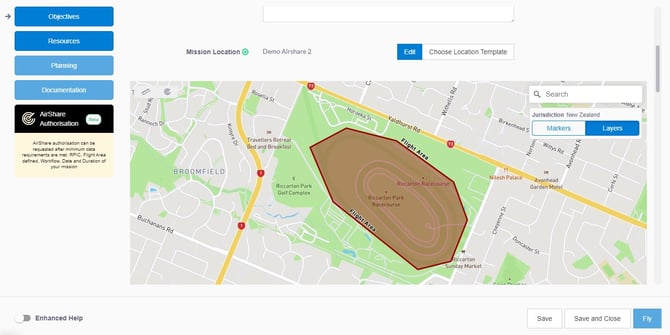
After creating your location, the following information must be completed to enable the authorisation:
- Remote Pilot selected
- Workflow selected (must be using Part 101 or Part 102 ruleset/authority)
- Date/Time & Duration of mission
- Planned Maximum height
You should enter these details into the mission planning screen as normal, and the Airshare panel will automatically update to show that authorisation is available when all criteria have been met.
Once authorisation is available, the request panel will be displayed at the bottom of the planning screen. Click on Request AirShare Authorisation to continue.

At this point you will be prompted for additional information to complete the authorisation. Click on the pencil icon to complete this.

Clicking the pencil icon will pop out a new panel with the following fields:
- Shielded Operation (Yes / No)
- Camera In Use (Yes / No)
- Flight Purpose
- Certified Transmitter (Yes / No)
- VHF Radio (Yes / No)
- Description of Operating Area
- Emergency Procedure
- Procedure to Measure Altitude
- Other Information
Complete these fields and click Save. Then click Request AirShare Airspace Authorisation to submit the request.
Mission must be in 'Draft' state to submit an Airshare Authorisation.
If the mission is in 'Ready To Fly' status or any status other than 'Draft', you will not be able to request an Airshare Authorisation.
Responses
There are two possible responses to your submission:
-
Authorisation Pending
A 'pending' response is most likely if your operation is planned with less than 48hrs time. Note that authorisation is not guaranteed and you should not proceed with the flight/s until your request has been approved.
-
Authorisation Approved (Provisional)
Usually you will recieve a provisional authorisation immediately, as the mission parameters have already been checked by FlyFreely prior to submission.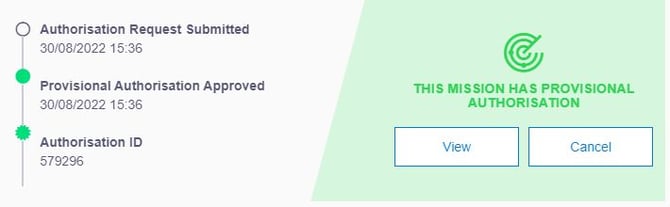
Once this approval has been obtained, you're able to select the Fly button to send your mission to Ready to Fly status and sync it to the field app.
Note that provisional approvals still require ATC contact / approval in order to operate in their airspace. You should contact ATC 15 minutes prior to your flight/s and again within 1hr of completing your mission.
Requesting authorisation via Field App
An AirShare authorisation can be obtained via the FlyFreely Field App. The same operational requirements and process apply.
Complete the mission plan on the Field App as usual (see Mission Planning in the FlyFreely Field App for instructions).
Note: You must be online to request authorisation.
At the bottom the authorisation will show 'None' or 'Available'. Click on 'Authorization', this will open a separate Airspace Authorisation screen.


The Airspace Authorisation screen will display the:
- Planned Flight Area
- Completed operational requirements
- Additional information required by AirShare to complete the authorisation


If any details are missing from the mission plan, you will be prompted to enter this first. For example, if you forget to enter max height:

Scroll to review and complete the additional information. Tap 'Request AirShare Aispace Authorisation' to continue.

Once approved, the confirmation details will be displayed. Scroll to view the authorisation and tap 'Acknowledge'.
If you need to cancel, tap 'Cancel Authorisation'.


The mission plan on the field app will now show the authorisation as 'Valid'.
You can click on 'Authorisation' to view the authorisation details.

A confirmation email from AirShare reflecting the approval status will be sent to you, provided your notification settings permit it.
A rejected authorisation request will display as 'Terminated' and if you tap on the authorisation it will show the rejected status. A confirmation email will also be sent to you from AirShare.

