For customers who wish to use the FlyFreely Office App in conjunction with a paper-based 'in field' workflow, the process will look like the following:
- Plan mission in the office app
- Print documents for field validation
- Conduct mission using printed documents and checklists
- Enter flight logs / batteries and complete mission
- Scan documents and upload into mission attachments
- CRP check flight records and finalize mission
This article will walk through the above steps to show how this process works and will cover the following:
Plan Mission
The first step is to plan your mission in the FlyFreely office app. For more information on planning your mission see How to plan a mission in the office app.
Print Validation Documents
(back to top)
This step will depend on your workflow, but as part of your planning, you will likely have completed some kind of Job Safety Assessment or Risk Assessment/s. You can export these completed forms as a .PDF file, which can then be printed and taken into the field for reference and field validation. There are 2 methods to export/print these documents:
- The easiest way to print multiple forms is via the Reports menu at the bottom of the mission planning screen. Select Field Validated Documents to produce a print-ready copy of all mission forms
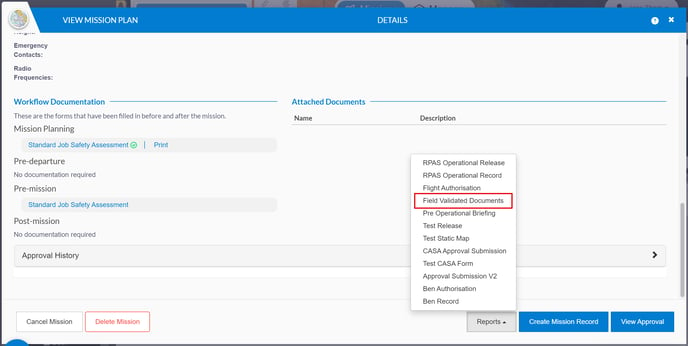
- You can also print these forms individually, simply by clicking on Print next to the document.

Using either method, your documents will be exported as .PDF files and will appear in your downloads folder. You can then print the documents and take them into the field, along with your existing checklists.

Conduct Mission
(back to top)
In conjunction with your existing mission checklists, the printed documents will allow you to keep the correct records of your operation - don't forget to bring a pen!
Enter Flight Logs
(back to top)
You will need to manually enter your flight logs, including RPA and battery information for each flight.
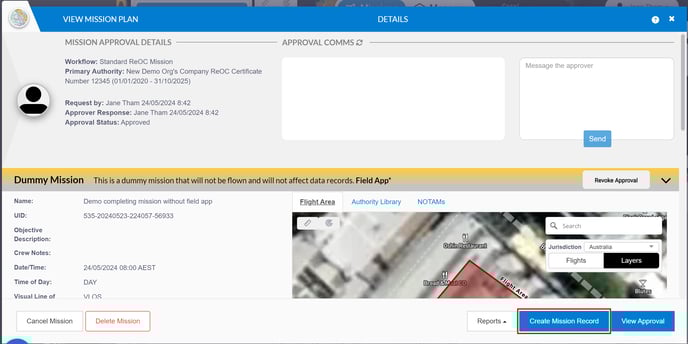
Open the relevant mission from the dashboard – this will open the mission details dialogue. Click Create Mission Record to begin.
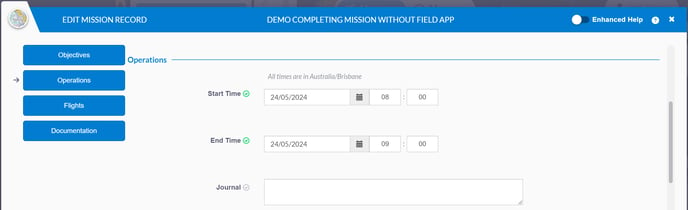
The first section of the Objectives dialog is related to general mission details. Mark your mission as ‘Completed’, ‘Partially completed’ or ‘Incomplete’ and enter any relevant details.

Next under Operations, enter the start and finish times for your mission (this is total time on site, not individual flights). The Journal area is for any general mission notes you might have.
Next is the Flights section. This is where you will transfer your flight details into FlyFreely to create a permanent record. You can add flights by clicking either of the buttons shown below. Enter the full details for each flight, including the individual flight time (this time will be logged against the selected battery/s, the selected RPA and the Remote Pilot). You can also upload any relevant documentation (for example if you have additional hand-written notes from the mission) that you’d like to add to the mission record.


Bulk Uploading Flights using FlyFreely Template
Uploading flight logs to mission
You can also upload your flight logs directly to the mission record without completing the FlyFreely csv template. Note: This does not support non DJI flight logs or any DJI Agras flight logs. See Uploading flight logs to a Mission Record
You can bulk upload your flights if you wish. To do this, you will need to download and complete the template.
1. Click 'Bulk Upload' > 'download a template', this will download a csv template.

2. Populate the csv file.
3. Once your csv file is ready to upload, click 'Select File' to select your file and click 'Open'. This will display the file selected. Check the details in the upload screen.
If highlighted (red or yellow) there is an issue with the data, you can click on the warning icon to review the issue. To edit: click on the data, make the change then click the 'tick' icon to complete the change.

4. Once you are ready to import, you have the option to select all rows or individual rows to import as indicated by the arrows, then click 'Import'.
The bulk import is complete.
Scan Documents and Import
(back to top)
In the Documentation section you can add your scanned forms here. As part of your post-mission process, you will need to scan your paper checklists to get them into a digital format. You can import virtually any file type into FlyFreely - common formats are JPG and PDF files. Once you've scanned your forms, add them as attachments here. You can either browse for your files or simply drag them onto the button from another window:

Submitting for Finalisation
When you are satisfied that everything is present and correct, press Submit for Finalisation.
This action will notify the Chief Remote Pilot (CRP) that the mission is ready to be finalised. The CRP will check the details to make sure that all requirements have been met and that everything looks correct, before finalising the mission. Once finalised, the mission will be ‘read only’ and no further edits can be made.

Please note: By pressing Submit for Finalisation, the Remote pilot is signing off on the mission record (in the same way that they’d physically sign a paper record). By pressing Finalise Mission, the CRP is countersigning the mission record.