Importing your DJI log files will ensure that your missions have the most accurate information regarding batteries, flight times and flight tracks/locations. Once files have been imported into FlyFreely, you can view the basic information within the platform and also export the original files for use in other software.
We generally recommend manual collection as a backup for the other methods, however in some instances this might be your preferred option - a good example would be operators using IOS devices (unable to use mission sync) and not wanting to upload flight logs to the DJI cloud (unable to use cloud sync) - in this case, manual collection is the best method of recording flight logs on your missions.
Note: To upload flight logs manually, the user must have the 'Manage Organisation Flight Logs' role assigned to them.
For more information on this role's permissions, please see Understanding user roles.
When operating a compatible DJI RPA using any of the official apps (eg DJI Go), the flight logs get stored on the device itself in both .txt and .dat formats. FlyFreely supports .txt files, please ensure to upload .txt file type.
This article will cover the following:
How to obtain your flight logs for IOS devices
How to obtain your flight logs for Android devices
Assigning your flight logs to Missions and Flights
Automatically Assign Manual Flight Logs
Uploading flight logs to a Mission Record
For IOS Devices
This section will walk through the steps to retrieve your flight logs from an IOS device using iTunes. If you don't already have the iTunes application, you can download it here.
Step 1: Complete your flights using an iOS device
When you operate a compatible DJI RPA using any of the official apps (eg DJI Go), the flight logs get stored on the device itself in both .txt and .dat formats. The following steps will show you how to extract these files from the device onto a Windows PC, and then import them into the FlyFreely platform.
Step 2: Access the Device via iTunes
Connect your mobile device to the computer via USB cable and open iTunes. Click the small phone icon below the menus near the top of the screen.
Once you've access the mobile device, look to the left of the screen and select File Transfer as shown below. You'll be presented with a list of mobile apps that have exportable data. Select the relevant DJI flight app from this list to show the files associated with that app.
Step 3: Transfer Flight Logs to your PC
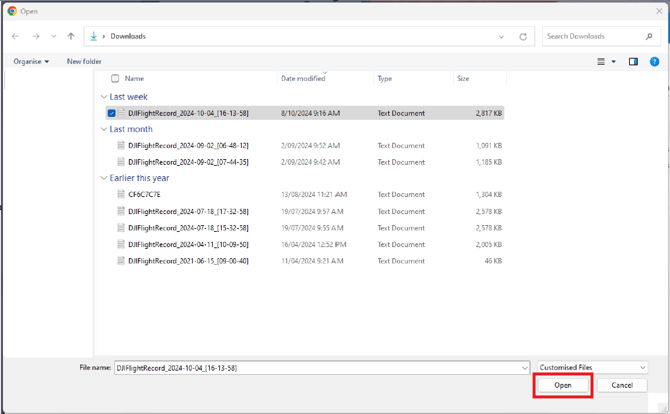
The logs are stored in the FlightRecords folder. Select this folder and click Save to transfer it. Browse to a convenient location on your computer to copy the folder.
Once the folder has been transferred, close iTunes and browse to the FlightRecords folder in it's new location. You should have something like the following:
These are the text files we'll be importing into FlyFreely in the next step.
Step 4: Open the Flight Logs Dialog in FlyFreely
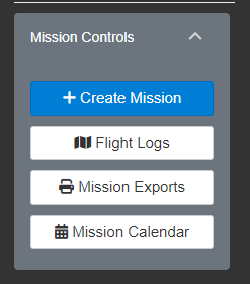
Navigate to the Flight Logs screen from the 'Missions' dashboard. The 'Flight Logs' button can be found on the left-hand panel.
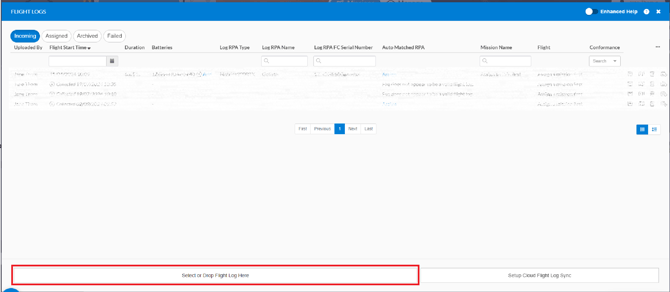
In flight logs screen, you can browse for files by clicking on 'Select or Drop Flight Log Here' button at the bottom and browse to the location of your log files. Select the relevant .txt file/s for import.
Click Open to import the log file.
Step 4: Assign Logs to Mission & Flights
The logs will be added to the flight logs list. From here you can assign them to the correct mission and flights. Watch the video or follow the steps below for detailed instructions on how to do this.
For Android Devices
Android users can browse the devices' filesystem directly from FlyFreely's flight logs screen.
Step 1: Complete Flight/s using Android Device
When you operate a compatible DJI RPA using any of the official apps (eg DJI Go), the flight logs get stored on the device itself in both .txt and .dat formats. The following steps will show you how to extract these files from the device onto a Windows PC, and then import them into the FlyFreely platform.
Step 2: Connect Device to PC via USB Cable
Connect your Android device to the computer. You should get a notification in Windows to let you know it's connected.
Step 3: Browse for Flight Logs (Office App)
Open FlyFreely on your computer and navigate to the Flight Logs screen by clicking the 'Flight Logs' button on the left-hand panel of the 'Missions' Dashboard.
Once in the flight logs screen, you can browse for files by clicking on 'Select or Drop Flight Log Here' button.
Select your device in the left hand column to view your device storage:
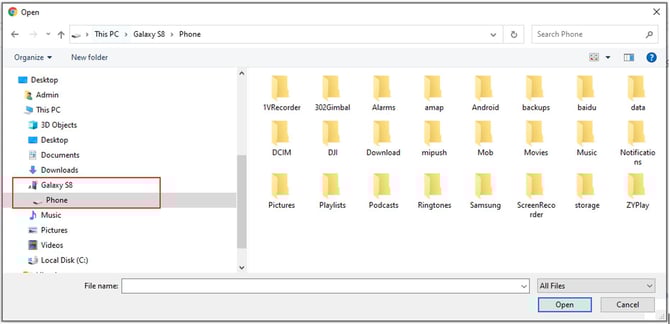
Browse to the relevant folder for your flight control app:
| DJI Go | [Device Name]\Phone\DJI\dji.pilot\FlightRecord |
| DJI Go 4 | [Device Name]\Phone\DJI\dji.go.v4\FlightRecord |
| DJI Fly | [Device Name]\Phone\DJI\dji.go.v5\FlightRecord |
| DJI Ground Station | Internal Memory\DJI\dji.prof.mg.gsp\log\(folder varies) |
| Drone Harmony | [Device Name]\Phone\DJI\com.droneharmony.planner\FlightRecord |
Select the specific files you want to import and click Open.
Step 4: Assign Logs to Mission & Flights
The logs will be added to the flight logs list. From here you can assign them to the correct mission and flights. Watch the video or follow the steps below for detailed instructions on how to do this.
Assigning your flight logs to Missions and Flights
Setting up 'Auto Matched RPA'
This step must be actioned once for each RPA in your organisation.
For more information on this, see Setting up 'Auto Matched RPA' from Captured Log Files
You can view and assign your flight logs from the flight logs screen. Here you will see a list of all flight logs for your account. You can arrange the results by any column by clicking on the arrows next to the column heading.

If your flight log information matches a pre-planned mission in FlyFreely, this process becomes semi-automatic, as the software will suggest the closest-matching mission. You can then either assign the log to that mission or select another if the suggested mission is incorrect.
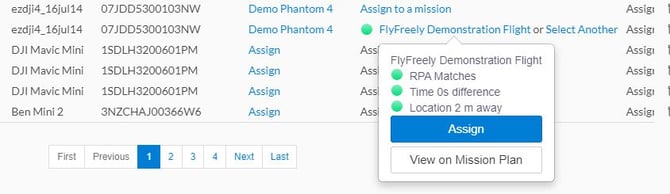
As you can see in our example, the software has matched the log to the mission based on the RPA being used, the time/date of the flight (compared to the planned time) and the distance from the planned flight area. These three factors are colour-coded using a 'traffic light' system where green indicates a strong match, yellow is a possible match and red is an unlikely match.
Repeat this process for each log file.
Once assigned to the mission, you can click on the mission name to assign logs to specific flights. To do this, simply drag the log file from the Unassigned Flight Logs section, onto the relevant flight. The log is now assigned to that specific flight record and the flight time, battery set etc will be updated based on the information in the flight log file.
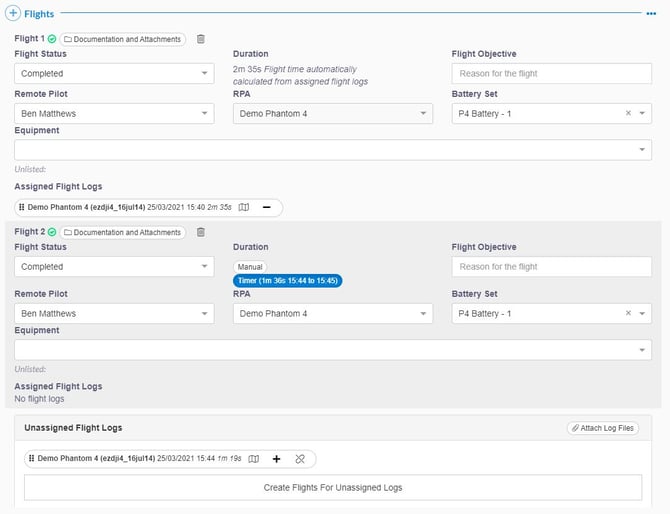
In our example, flight 1 has been assigned a flight log and it's duration has been extracted from the log file. Flight 2 shows the in-app flight timer information as we haven't yet assigned it a log file.
Automatic Assignment of Flight Logs
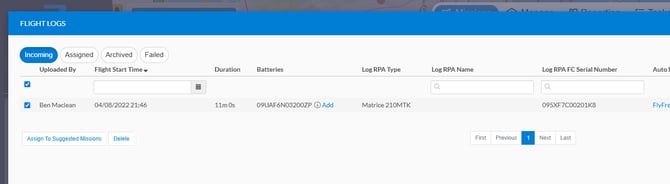
When importing flight logs manually, the newly imported logs will appear in the 'Incoming' tab of the flight log screen. Where a corresponding mission exists in FlyFreely (based on date, location and RPA used), that mission will be suggested.
To automatically assign your logs to their suggested missions, use the multi-select checkboxes on the left hand side. An option will appear to 'Assign to suggested mission'. This will bulk-assign the selected logs to their respective mission/s.
Mission suggestion must be configured - see here for more information.
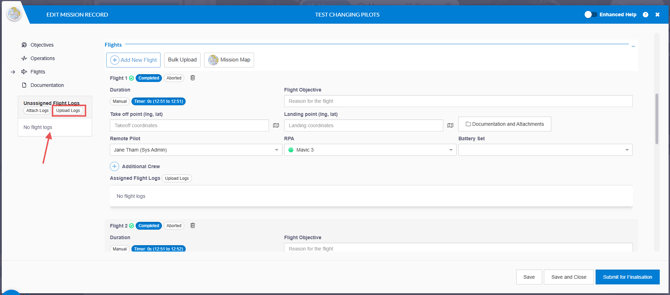
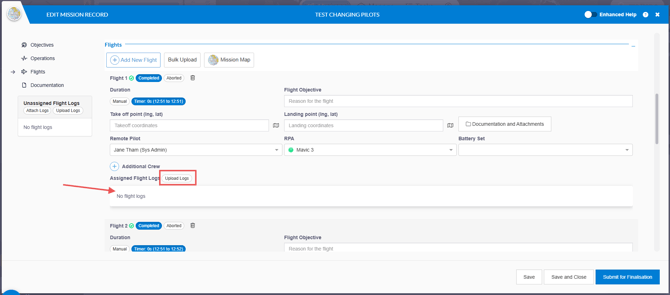
Uploading flight logs to a Mission Record
You can upload your flight logs directly to your mission record.
- Click on the mission
- Click on 'Edit Mission Record'

- Click on 'Flights' or scroll down to the 'Flights' section
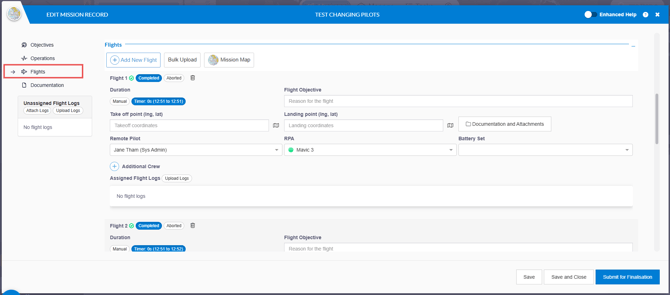
- Here you can upload your flight logs to the 'Unassigned Flight Logs' box on the left or to the relevant flights in the mission record
- Upload to 'Unassigned Flight Logs': Click the 'Upload Logs' button or drag and drop the flight logs to this box.
- Upload to relevant flights: Click the 'Upload Logs' button or drag and drop the flight logs to the relevant flight in white box under 'Assigned Flight Logs'.
- Upload to 'Unassigned Flight Logs': Click the 'Upload Logs' button or drag and drop the flight logs to this box.
- Save your changes.
Selecting multiple flight logs
You can select multiple flight logs to upload so you don't need to upload flight logs individually. This is available for both the drag and drop option, and selecting from the file explorer using the 'Upload Logs' button.